null
Mounting Accessories

Mounting Accessories

Getting a ductless mini split installed correctly starts before the unit ever goes on the wall. A poorly chosen or poorly placed mounting bracket puts the outdoor unit at risk, throws off refrigerant line routing, and creates vibration problems that show up weeks later. HVAC365 stocks a broad selection of mounting accessories so you can get the right hardware for the job, whether you are hanging a single-zone system in a bedroom or outfitting a multi-zone commercial build. These are the components that hold the system in place, protect the line set, and give an install a finished, professional look. Residential homeowners handling a DIY mini split install, commercial contractors coordinating multi-zone projects, independent HVAC technicians pulling the hardware they need for a specific job, and distributors sourcing mounting components in volume all land here. The needs differ by scale, but the underlying question is the same: does the mounting hardware fit the unit, fit the site, and fit the application? Mounting accessories also come into play for system replacements — when an existing condenser is being swapped out, the old bracket may not match the new unit's footprint or weight, and it is worth verifying compatibility before assuming the hardware carries over. For upgrade projects moving from a single-zone to a multi-zone system, the same check applies: a bracket sized for a smaller condenser is not a safe substitute for one rated to the larger unit's weight.

Choosing the Right Mounting Hardware

The most important variable to sort out before picking a mounting bracket or pad is how much the outdoor unit weighs. Mini split condensers span a wide range of sizes, and a bracket rated for a small single-zone unit is not appropriate for a larger multi-zone system. Check the condenser's weight and physical dimensions from the manufacturer's spec sheet, then match that against the bracket's rated load capacity and footprint. Guessing at this and getting it wrong is one of the more common mistakes on a mini split install, and it is cheap to get right the first time.

Beyond load rating, think about where the unit is going. A ground-level installation on a solid concrete pad is a different situation from a wall-mounted bracket three stories up, which is different again from a rooftop mount on a commercial building. Each environment has its own requirements around vibration isolation, wind exposure, and clearance from the building surface. A bracket designed for wall mounting may not suit a rooftop application, even if the weight ratings are compatible. Consider the mounting surface too: brick, wood framing, and metal studs each require different fastener approaches, and the bracket you choose should be appropriate for what it is being anchored into.

Vibration and noise are worth thinking about as a buying decision, not just an afterthought. Compressors create low-frequency vibration that can telegraph through a rigid bracket directly into a wall or floor. Anti-vibration pads and isolator feet interrupt that transmission path and reduce noise inside the building. For residential installs where the bedroom is on the other side of the exterior wall, this is the kind of detail that earns a callback versus a complaint. For a light commercial install in an office building, it matters just as much.

If you are installing line set covers alongside the mounting hardware, think through the routing before you commit to bracket placement. The bracket position largely determines where the refrigerant lines, electrical, and condensate drain exit the building. If the cover channel does not line up cleanly with that exit point, the finished installation looks improvised. Plan the full path from indoor head to outdoor condenser before any hardware goes on the wall, and the cover installation becomes straightforward rather than a problem to work around.

For contractors spec-matching hardware to a specific job, lead times and availability are worth factoring in early. A bracket that is backordered and a condenser sitting on site waiting for it is a real project cost. For distributors sourcing mounting accessories in volume, it is worth confirming that the hardware you stock is compatible with the mix of equipment brands and sizes your customers are actually installing, since mounting dimensions are not always universal across manufacturers.

Buying Tips

  • Do not assume universality. Many mounting brackets are listed as universal, but that label covers a range. Always cross-reference the bracket's physical dimensions and weight rating against the specific condenser you are mounting. A bracket that fits 90 percent of units in a given class may still be wrong for the one you have on site.
  • Buy the anti-vibration pads at the same time. They are inexpensive and easy to install during the initial mount. Adding them after the fact often means unbolting and repositioning the condenser, which is a much bigger job.
  • Think about service clearance, not just installation clearance. Brackets placed too close to a wall or obstruction may technically allow the unit to operate but make coil cleaning and refrigerant service difficult. Check the manufacturer's minimum service clearance requirements before the bracket goes up, not during the next maintenance visit.
  • Match the cover system to the bracket position. Line set covers come in different channel widths and mounting profiles. If you are buying a cover and a bracket from different sources, verify that the cover channel can accommodate the number and size of lines running from your specific system.

Types of Mounting Accessories and When to Use Each

Mounting accessories for ductless mini splits cover several distinct product types, and each solves a specific part of the installation problem. Understanding which one you actually need keeps you from arriving on site missing something.

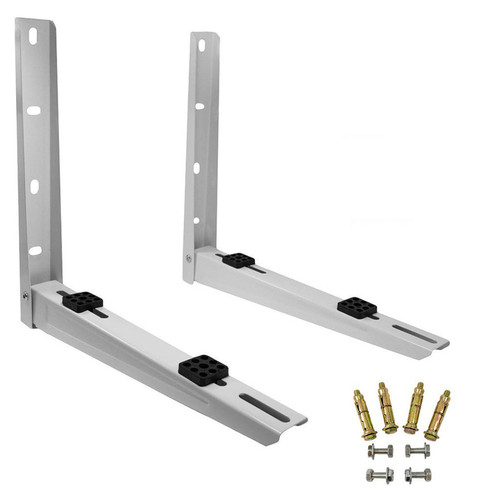
  • Wall-mount brackets: The most common type for residential and light commercial installs. A pair of horizontal rails bolts to the exterior wall, and the condenser sits on top. These are appropriate where there is solid backing behind the exterior cladding and enough wall clearance to keep the unit away from obstructions. Bracket width and leg spacing need to match or be adjustable to fit the condenser's base footprint.
  • Ground-mount pads and stands: Used when wall mounting is impractical, when local code requires it, or when the installation site is at grade level. Concrete pads provide a stable, level platform that keeps the condenser off the ground and allows water and debris to drain away from the base. Plastic composite ground pads are an alternative where pouring concrete is not an option. These are common for residential backyard installations and for equipment at grade in light commercial applications.
  • Rooftop mounting systems: Commercial and some residential flat-roof applications require hardware designed to distribute weight across the roof surface and resist wind uplift. These systems typically involve more substantial framing and may need to coordinate with the building's structural and waterproofing requirements. This is a different class of hardware from a standard wall bracket, and a job that calls for rooftop mounting needs rooftop-rated hardware.
  • Anti-vibration isolators and pads: These sit between the condenser base and the mounting bracket or pad to absorb compressor vibration before it reaches the structure. They are inexpensive relative to the callback cost of a vibration complaint after install. They are compatible with most bracket types and are a standard addition for any install where the outdoor unit is close to a living or occupied space.
  • Line set covers and channel systems: Once the condenser is mounted, the refrigerant lines, electrical wiring, and condensate drain run exposed unless a cover is installed. Line set covers protect those runs from UV, mechanical damage, and weather while giving the installation a finished appearance. They are available in different widths to accommodate different numbers of lines and in different materials suited to interior versus exterior use.

What to Check Before the Install

Mounting accessories are physically simpler than the refrigerant system itself, but there are still several site conditions worth verifying before you commit to a bracket position and start drilling.

Check what is behind the mounting surface. A wall bracket anchored only into exterior cladding without hitting solid framing or blocking is a structural problem waiting to happen. On a residential wood-frame wall, locate studs or install appropriate blocking before hanging anything. On masonry or concrete, verify that the anchor type is rated for the load in that substrate. Different anchors behave very differently in hollow block versus solid concrete, and the bracket's own fastener requirements should guide that choice.

Measure the clearance around where the condenser will sit, then look up the manufacturer's minimum clearances for that unit. Clearances for airflow on the intake and discharge sides are not suggestions; restricting them reduces efficiency and can eventually damage the compressor. Wall-mounted brackets that put the condenser too close to a soffit, corner, or fence limit the airflow the system needs to operate properly.

Look at the line set path from the proposed bracket position to the service port on the wall. The refrigerant lines need to slope correctly for condensate drainage and should not have sharp bends that could kink the tubing or restrict refrigerant flow. This path also determines where the line set cover channel runs if you are using one. Measure that full path before you place the bracket, not after.

For installations in areas with significant snow load, check whether the bracket keeps the condenser high enough to stay clear of typical snow accumulation. A unit that gets buried in a heavy snow event loses airflow and can be damaged. Some manufacturers specify a minimum height above grade for cold-climate installations, and that number is worth pulling from the spec sheet before the bracket position is set.

Finally, check for any local permit or code requirements that govern how outdoor equipment is mounted in your jurisdiction. Some areas have specific rules about setbacks from property lines, anchor requirements for high-wind zones, or restrictions on rooftop equipment. Pulling the right permit before the install is much easier than addressing a code issue after the fact.

Things You Should Know

Q: What weight rating do I need for a mini split mounting bracket?

A: Match the bracket's rated load capacity to the actual weight of the outdoor condenser unit you are mounting. That weight is on the manufacturer's spec sheet or on the unit's nameplate. Do not rely on a general size class estimate. Give yourself some margin above the condenser's listed weight, especially if the bracket will also support line set cover channel or other attached hardware.

Q: Are mini split mounting brackets universal across brands?

A: Most wall brackets are adjustable within a range of condenser footprints, and many are marketed as universal, but that does not mean they fit every unit. Always verify that the bracket's physical dimensions and weight rating are appropriate for the specific condenser you are mounting. This applies equally when replacing an existing system — a bracket that fit the old condenser may not suit the replacement unit. Mounting dimensions vary across manufacturers and even across product lines within the same brand.

Q: Do I need anti-vibration pads, or are they optional?

A: They are technically optional but strongly worth including, particularly when the outdoor unit is mounted on or close to a wall adjacent to a living or sleeping area. Compressor vibration that reaches the structure creates low-frequency noise inside the building. Anti-vibration isolators are inexpensive and easiest to install during the initial mount — adding them after the fact requires unbolting and repositioning the condenser, as the buying tips above cover.

Q: Can I mount a ductless condenser directly on the ground?

A: Yes, with the right support. The condenser needs to sit on a level, stable platform that keeps it off the ground surface and allows water to drain away from the base. Concrete pads and plastic composite ground pads are the standard options, covered in detail under the product types above. Placing a condenser directly on soil or an unstable surface leads to settling, water intrusion, and airflow problems. Check the manufacturer's minimum height above grade if the installation site gets significant snow accumulation.

Q: Do line set covers come in standard sizes, or do I need to measure?

A: Line set covers come in different channel widths, and the right width depends on the number and diameter of lines running from your system. Measure the total bundle diameter of your refrigerant lines, electrical, and condensate drain together, then select a cover channel wide enough to accommodate that bundle with the cover closed. Buying a cover that is too narrow to close over the actual line set is a common and avoidable mistake.

Q: What clearance does a wall-mounted condenser need?

A: Clearance requirements vary by unit and manufacturer. Look up the minimum airflow clearances specified for your specific condenser in the installation manual — these cover the intake side, discharge side, and sides of the unit. The pre-install site checks above walk through how to verify clearance before committing to a bracket position.

Q: Is a permit required to install a mini split mounting bracket?

A: Permit requirements depend on your local jurisdiction. Some areas require a permit for any outdoor HVAC equipment installation; others have specific requirements for high-wind zones, setbacks from property lines, or rooftop equipment. Check with your local building department before starting the installation. Addressing a permit issue after the equipment is already mounted is more disruptive than pulling the right permit upfront.

HVAC365 ships mounting accessories nationwide, stocking a broad selection of brackets, pads, isolators, and line set covers so the right hardware is available whether you need a single bracket for a residential job or a larger volume of hardware for a commercial project or distributor account. Having the correct mounting components in stock when you need them means the install moves forward on your schedule, not around a parts delay.

Compare

Fast Shipping

Easy Returns

Warranty Coverage

Financing Available